
This chapter will take you through the steps required for creating an application in NCS for nRF9160.
This blog is based on the Nordic Connect SDK v1.2.0 version. It may have need to change on the other versions (later). The propose of this blog is to show the idea how to run such example on NCS.
nRF9160 DK board
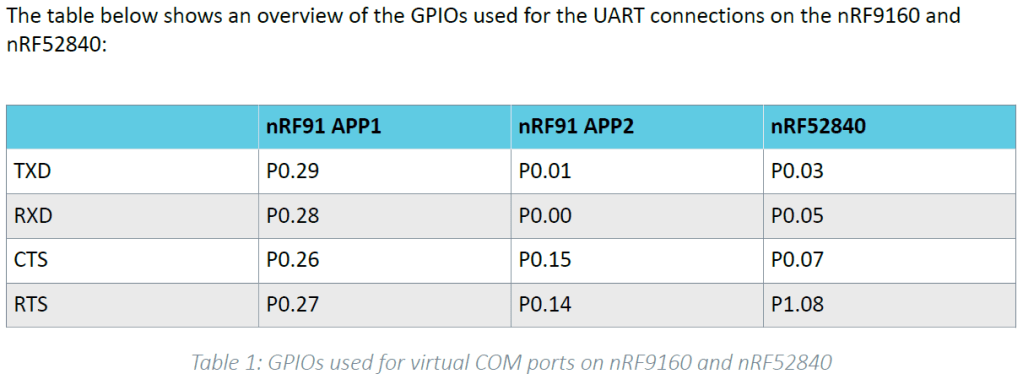
The virtual COM ports are the following:
• VCOM0 – Connected to nRF9160 (default)
• VCOM1 – Connected to nRF52840 (nonconfigurable)
• VCOM2 – Not connected to nRF9160 (default)
Performance measurement mode
By measuring the current consumption of the nRF9160 through nRF9160 DK board,
The performance measurement mode can be selected by moving the IFMCU DISCONN switch (SW1) to the right position, which disconnects the interface MCU from the nRF9160 SiP using analog switches.
This is done to isolate the nRF9160 SiP as much as possible and can be of use when measuring currents on
low-power applications.

Block diagram

GPIO interfaces
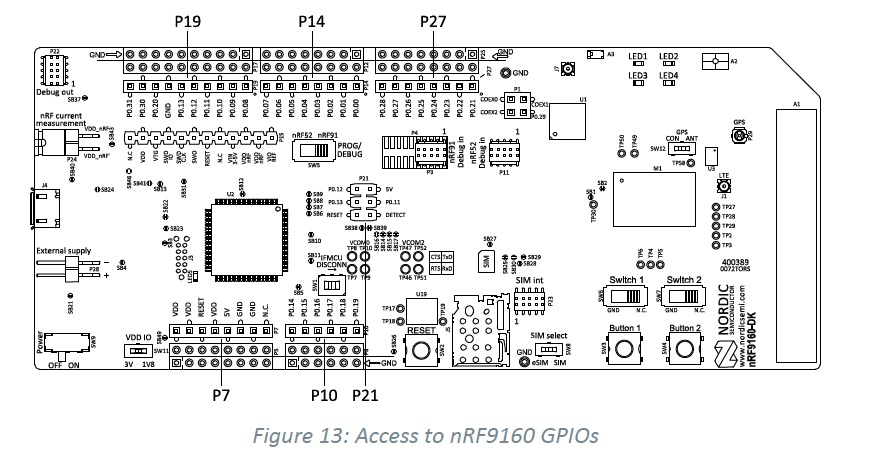
GPIO signals are also available on connectors P5, P6, P12, P17, and P25, which are on the bottom side of the board. By mounting pin lists on the connector footprints, the nRF9160 DK board can be used as a shield for Arduino motherboards.
Zephyr Building System
https://docs.zephyrproject.org/latest/application/index.html
Environment Variables
Windows:
You can use the setx program in cmd.exe or the third-party RapidEE program.
To use setx, type this command, then close the terminal window. Any new cmd.exe windows will have MY_VARIABLE set to foo.
setx MY_VARIABLE foo
To install RapidEE, a freeware graphical environment variable editor, using Chocolatey in an Administrator command prompt:
choco install rapidee

Important Environment Variables
Here are some important environment variables and what they contain. This is not a comprehensive index to the environment variables which affect Zephyr’s behavior.
BOARD: allows set the board when building an application; see Important Build System Variables.CONF_FILE: allows adding Kconfig fragments to an application build; see Important Build System Variables.DTC_OVERLAY_FILE: allows adding devicetree overlays to an application build; see Important Build System Variables.ZEPHYR_BASE: the absolute path to the mainzephyrrepository. This is set whenever you run thezephyr-env.shorzephyr-env.cmdscripts mentioned above.ZEPHYR_TOOLCHAIN_VARIANT: the current toolchain used to build Zephyr applications.
Important Build System Variables
You can control the Zephyr build system using many variables. This section describes the most important ones that every Zephyr developer should know about.
Note
The variables BOARD, CONF_FILE, and DTC_OVERLAY_FILE can be supplied to the build system in 3 ways (in order of precedence):
- As a parameter to the
west buildorcmakeinvocation via the-Dcommand-line switch - As Environment Variables.
- As a
set(<VARIABLE> <VALUE>)statement in yourCMakeLists.txt
- ZEPHYR_BASE: Sets the path to the directory containing Zephyr, which is needed by the build system’s boilerplate file. This is an environment variable set by the
zephyr-env.shscript on Linux/macOS orzephyr-env.cmdon Windows, as you learned when getting started with Zephyr in Build the Blinky Application. You can also set ZEPHYR_BASE explicitly, but then you won’t get the other features provided by those scripts. - BOARD: Selects the board that the application’s build will use for the default configuration. See Supported Boards for built-in boards, and Board Porting Guide for information on adding board support.
- CONF_FILE: Indicates the name of one or more configuration fragment files. Multiple filenames can be separated with either spaces or semicolons. Each file includes Kconfig configuration values that override the default configuration values.See The Initial Configuration for more information.
- DTC_OVERLAY_FILE: Indicates the name of one or more devicetree overlay files. Multiple filenames can be separated with either spaces or semicolons. Each file includes devicetree values that override the default DT values. See Devicetree Overlays below for details on devicetree overlays, and Devicetree for an overview on devicetree and Zephyr.
- ZEPHYR_MODULES: A CMake list containing absolute paths of additional directories with source code, Kconfig, etc. that should be used in the application build. See Modules (External projects) for details.
Rebuilding an Application
Application development is usually fastest when changes are continually tested. Frequently rebuilding your application makes debugging less painful as the application becomes more complex. It’s usually a good idea to rebuild and test after any major changes to the application’s source files, CMakeLists.txt files, or configuration settings.
Important
The Zephyr build system rebuilds only the parts of the application image potentially affected by the changes. Consequently, rebuilding an application is often significantly faster than building it the first time.
Sometimes the build system doesn’t rebuild the application correctly because it fails to recompile one or more necessary files. You can force the build system to rebuild the entire application from scratch with the following procedure:
- Open a terminal console on your host computer, and navigate to the build directory
<home>/app/build. - Enter one of the following commands, depending on whether you want to use
westorcmakedirectly to delete the application’s generated files, except for the.configfile that contains the application’s current configuration information.- west build -t clean
- or
- ninja clean
- Alternatively, enter one of the following commands to delete all generated files, including the
.configfiles that contain the application’s current configuration information for those board types.- west build -t pristine
- or
- ninja pristine
- If you use west, you can take advantage of its capability to automatically make the build folder pristine whenever it is required.
- Rebuild the application normally following the steps specified in Building an Application above.
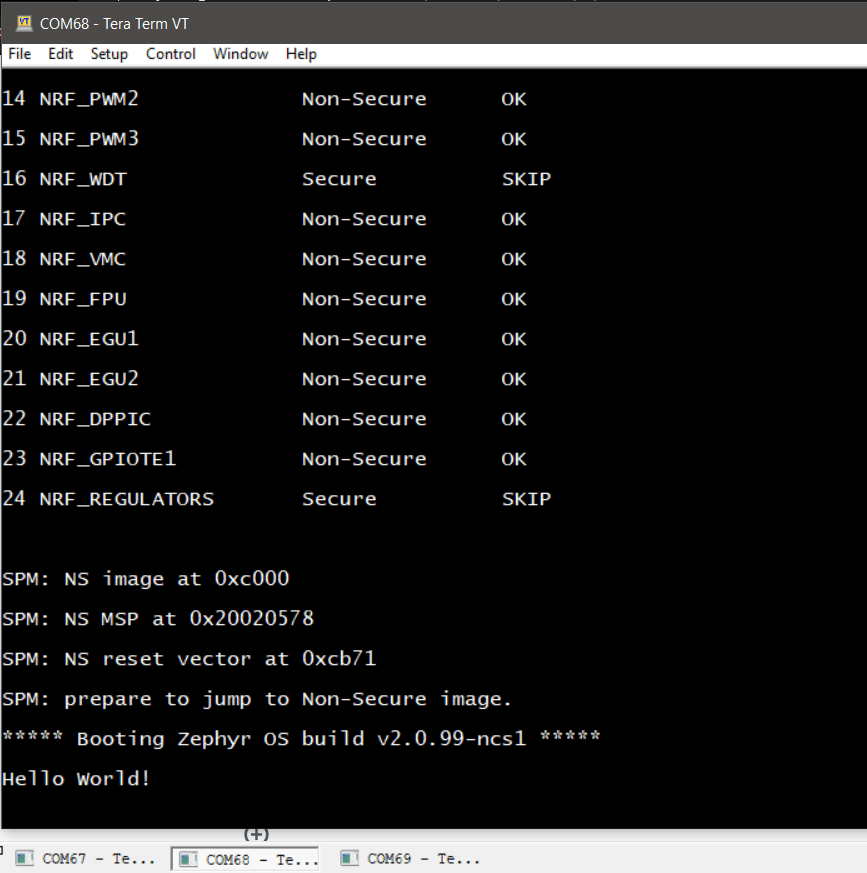
Example 1:Hello World on nRF9160 DK
The first section (Your first “Hello World”) will show you how to create a minimal working example which function is to log “Hello World”, both using Segger Embedded Studio (SES) and the Zephyr extension commands in west. At the end of the section I will show you how to manage a multi repository environment using west, specifically how to update NCS and how to preserve you application when going from one revision of nrf to another.
main.c
#include <zephyr.h>
#include <misc/printk.h>

void main(void)
{
        printk("Hello World!\n");
}
proj.conf
#
# Copyright (c) 2019 Nordic Semiconductor ASA
#
# SPDX-License-Identifier: LicenseRef-BSD-5-Clause-Nordic
#
# General config

CONFIG_SERIAL=y
CONFIG_UART_0_NRF_UARTE=y
Example 2 – Blinky LED
This example is to configure a particular LED for blinky on nRF9160 DK board. My target is to change the LED 0 to LED 3 for blinky.
Based on the Hello world example and add the LED blinky code inside the main.c.
#include <zephyr.h>
#include <device.h>
#include <stdio.h>
#include <misc/printk.h>
#include <drivers/gpio.h>

#define LED_PORT  DT_ALIAS_LED0_GPIOS_CONTROLLER
#define LED       DT_ALIAS_LED0_GPIOS_PIN

/* 1000 msec = 1 sec */
#define SLEEP_TIME  200

void main(void)
{
        printk("Hello World with LED!\n");

        u32_t cnt = 0;
        struct device *dev;

        dev = device_get_binding(LED_PORT);

        if (dev == NULL) {
                printf("Device not found\n");
                return;
        }
        /* Set LED pin as output */
        gpio_pin_configure(dev, LED, GPIO_DIR_OUT);

        while (1) {
                /* Set pin to HIGH/LOW every 1 second */
                gpio_pin_write(dev, LED, cnt % 2);
                cnt++;
                k_sleep(SLEEP_TIME);
        }
}
Modify the prj.conf (add CONFIG_GPIO=y)
#
# Copyright (c) 2019 Nordic Semiconductor ASA
#
# SPDX-License-Identifier: LicenseRef-BSD-5-Clause-Nordic
#
# General config

CONFIG_SERIAL=y
CONFIG_UART_0_NRF_UARTE=y

CONFIG_STDOUT_CONSOLE=y

CONFIG_HEAP_MEM_POOL_SIZE=16384
CONFIG_DISPLAY=y
CONFIG_LOG=y

CONFIG_GPIO=y
Add the overlay file (nrf9160_pca10090ns.overlay)

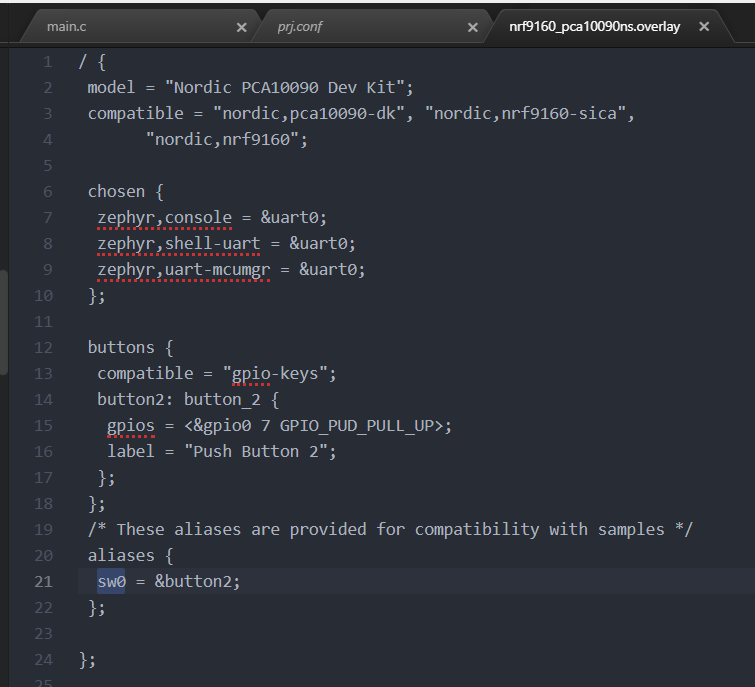
Example 3 – Detect the Button pressing
This example is to show how to configure the button from 1 to 2 and get the system tick.
- Use the example from zephyr\samples\basic\button and copy it to nrf\github_xxx\nrf9160_pca10090
- add the main.c and modify the prj.conf to enable the printk
CONFIG_GPIO=y
CONFIG_SERIAL=y- main.c file as below
/*
 * Copyright (c) 2016 Open-RnD Sp. z o.o.
 *
 * SPDX-License-Identifier: Apache-2.0
 */

#include <zephyr.h>
#include <device.h>
#include <drivers/gpio.h>
#include <sys/util.h>
#include <sys/printk.h>
#include <inttypes.h>

/* change this to use another GPIO port */
#ifndef DT_ALIAS_SW0_GPIOS_CONTROLLER
#ifdef SW0_GPIO_NAME
#define DT_ALIAS_SW0_GPIOS_CONTROLLER SW0_GPIO_NAME
#else
#error SW0_GPIO_NAME or DT_ALIAS_SW0_GPIOS_CONTROLLER needs to be set in board.h
#endif
#endif
#define PORT DT_ALIAS_SW0_GPIOS_CONTROLLER

/* change this to use another GPIO pin */
#ifdef DT_ALIAS_SW0_GPIOS_PIN
#define PIN     DT_ALIAS_SW0_GPIOS_PIN
#else
#error DT_ALIAS_SW0_GPIOS_PIN needs to be set in board.h
#endif

/* change to use another GPIO pin interrupt config */
#ifdef DT_ALIAS_SW0_GPIOS_FLAGS
#define EDGE    (DT_ALIAS_SW0_GPIOS_FLAGS | GPIO_INT_EDGE)
#else
/*
 * If DT_ALIAS_SW0_GPIOS_FLAGS not defined used default EDGE value.
 * Change this to use a different interrupt trigger
 */
#define EDGE    (GPIO_INT_EDGE | GPIO_INT_ACTIVE_LOW)
#endif

/* change this to enable pull-up/pull-down */
#ifndef DT_ALIAS_SW0_GPIOS_FLAGS
#ifdef DT_ALIAS_SW0_GPIOS_PIN_PUD
#define DT_ALIAS_SW0_GPIOS_FLAGS DT_ALIAS_SW0_GPIOS_PIN_PUD
#else
#define DT_ALIAS_SW0_GPIOS_FLAGS 0
#endif
#endif
#define PULL_UP DT_ALIAS_SW0_GPIOS_FLAGS

/* Sleep time */
#define SLEEP_TIME 500

void button_pressed(struct device *gpiob, struct gpio_callback *cb,
                    u32_t pins)
{
        printk("Button pressed at %" PRIu32 "\n", k_cycle_get_32());
}

static struct gpio_callback gpio_cb;

void main(void)
{
        struct device *gpiob;

        printk("Press the user defined button on the board\n");
        gpiob = device_get_binding(PORT);
        if (!gpiob) {
                printk("error\n");
                return;
        }

        gpio_pin_configure(gpiob, PIN,
                           GPIO_DIR_IN | GPIO_INT |  PULL_UP | EDGE);

        gpio_init_callback(&gpio_cb, button_pressed, BIT(PIN));

        gpio_add_callback(gpiob, &gpio_cb);
        gpio_pin_enable_callback(gpiob, PIN);

        while (1) {
                u32_t val = 0U;

                gpio_pin_read(gpiob, PIN, &val);
                k_sleep(SLEEP_TIME);
        }
}
- Add the overlay file (nrf9160_pca10090ns.overlay)
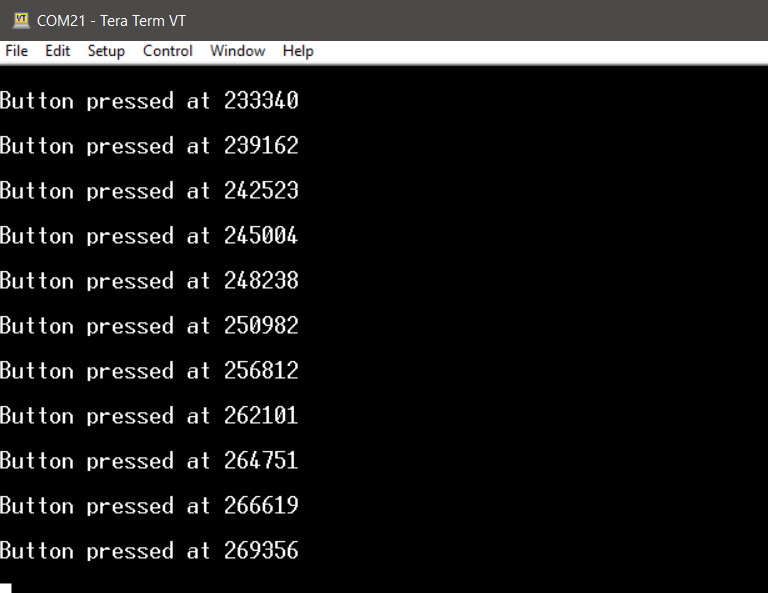
By pressing the button 2, it would show the result as below.
Example 4 — SSD1306 LCD 128 x 64
This example is to show how to port the SSD1306 LCD on the nRF9160 DK board. It is similar to the example which I did on the nRF52 DK board.
https://jimmywongiot.com/2019/02/20/oled-display-support-for-nrf52-series/
Zephyr has already supported multiple display drivers.
https://docs.zephyrproject.org/latest/reference/kconfig/CONFIG_SSD1306.html
I plan to use the example character frame buffer as the baseline to do this demo. (https://docs.zephyrproject.org/latest/samples/display/display.html)
Basically, there is a display SSD1306 module on the zephyr project.
https://docs.zephyrproject.org/latest/boards/shields/ssd1306/doc/index.html
I used the nRF52840 DK (nrf52840_pca10056) to work with SSD1306 128×32 as example for testing.
Step 1: Modify the CMakeLists.txt
- Add the SHIELD ssd1306_128x32
- Add the nrf52840_pca10056

Step 2: Add the overlay to reconfigure the TWI pin

Command line on the nRF52840 DK board
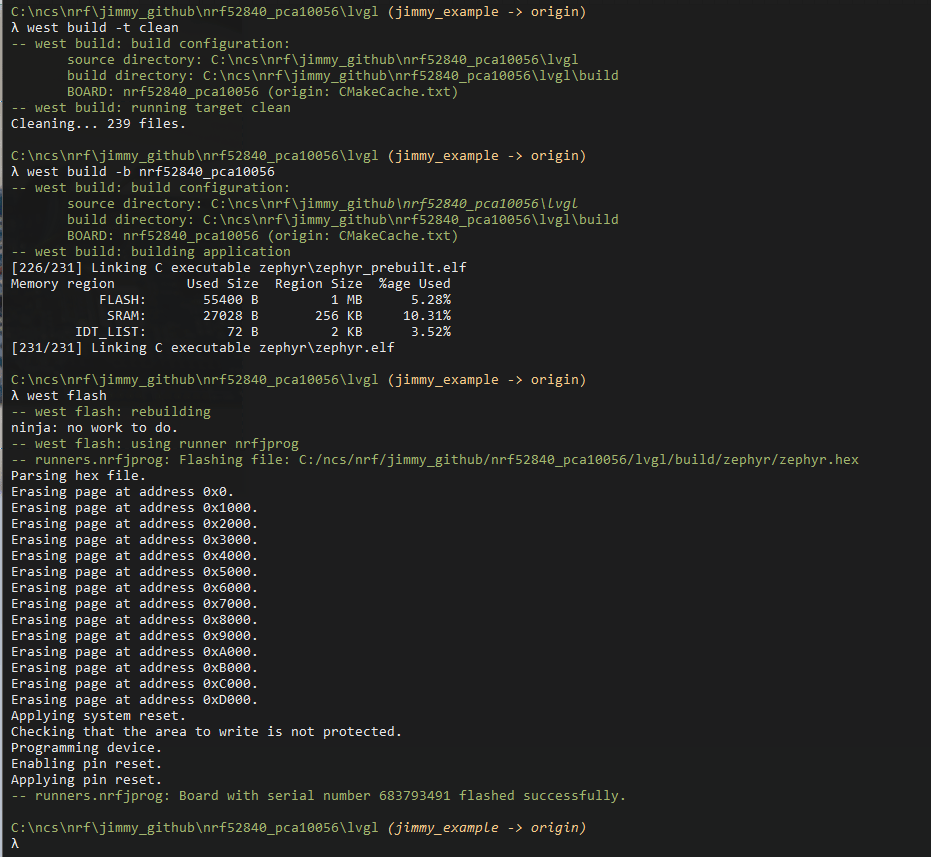
Result

Example 5 — SD Card with nRF9160
Example 6 – SSD 1306 Display with nRF9160
Example 7 — 240×320 Display with nRF9160
If you have any suggestion which examples are interested, you can leave comments here.
I plan to continuous try on the example 5, 6, 7 on the next blog.
Continue …..on the Next Blog later……
Thanks for your interests on my blog. Since 2019, I have created this blog and shared the idea how to do some funny stuffs. I am very pleasure that I get quite a lot of positive feedback. I really hope that this blog helps your own embedded solution development. May I get support from you to keep it in order to maintain the wordpress host service? Your appreciation would be very helpful.
https://jimmywongiot.com/2021/05/26/asking-for-support/


Hi,
I needed an application based help on the nRF9160DK. I am trying to schedule events based on real clock time. I want to turn on my modem everyday at 10:00 am in the morning and turn my modem off at 10:05 am. Can you help me out with a code for this kind of application.
LikeLike
Please visit Nordic Official devzone to raise your question. You should get some helps from there.
LikeLike
Great article. Keep doing a great job.
LikeLike
Thank you for your post, please keep ongoing with this amazing job!
LikeLike
Thanks for the great guide!
Do you sometimes hit “z_arm_exc_spurious” error handler?
How do you debug that?
LikeLike
What version of the NRF5340 / nRF9160 do you use now? Are you using the NRF5340PDK or DK board?
It may be related to some workarounds which works with PDK but it doesn’t work with DK board.
For example, YOPAN-53 is only working for the PDK, but it causes the z_arm_exc_spurious which I know.
int ret;
/* Use this to turn on 128 MHz clock for cpu_app */
ret = nrfx_clock_divider_set(NRF_CLOCK_DOMAIN_HFCLK, NRF_CLOCK_HFCLK_DIV_1);
RET_IF_ERR(ret – NRFX_ERROR_BASE_NUM);
/* Enable YOPAN-53 for lower power consumption on nRF5340 */
*((volatile uint32_t *)0x50004728ul) = 0x1;
Please go through the devzone to ask more details if you have further question.
LikeLike
Superb, please continue with the SDCARD!
LikeLike
Hi can you please help us with cloud Client example or https client example
thank you in advance
LikeLike
I don’t have such demo.
LikeLike