
I would like to update the procedures on how to set up the environment for nRF9160 software development particular by using the Nordic Connect SDK. This blog is just to introduce how to compile the existing example inside the Nordic Connect SDK.
nRF Connect for Desktop
First, it is better to install the nRF Connect Desktop.

Separate downloads are provided for Windows, Linux and macOS.
And then install the Getting Started Assistant,

Getting Started Assistant provides all the steps how to setup the NCS environment.

Meanwhile, you can check the online documentation of NCS (Nordic Connect SDK) for reference.
https://developer.nordicsemi.com/nRF_Connect_SDK/doc/latest/nrf/index.html

Apart from this blog, there are some tutorials on the Nordic blog.
- nRF Connect SDK Tutorial – Part 1
- nRF Connect SDK Tutorial – Part 2
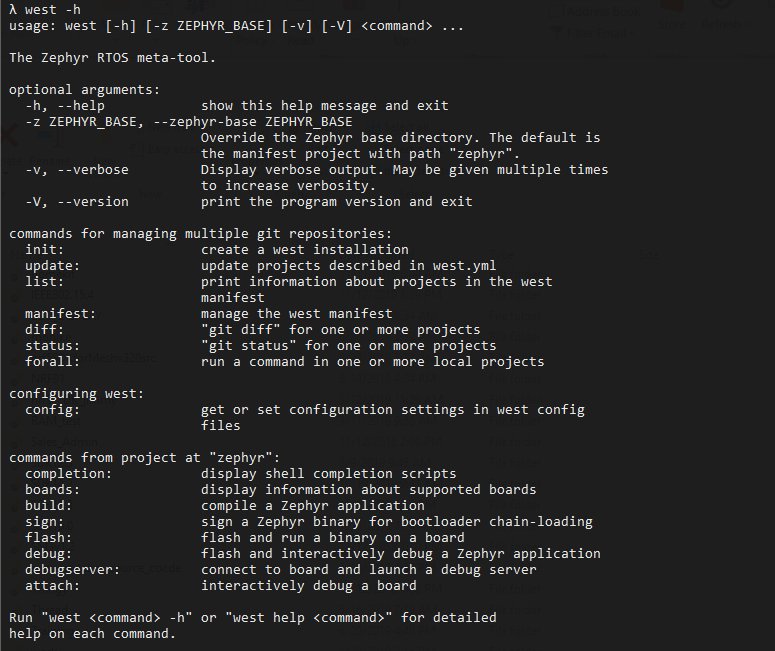
West (Zephyr’s meta-tool)
The Zephyr project includes a swiss-army knife command line tool named west[1]. West is developed in its own repository. Like git and docker, the top-level west command takes some common options, a sub-command to run, and then options and arguments for that sub-command:
west [common-opts] <command> [opts] <args>Take a look at the Zephyr documentation for a more in depth understanding.
Nordic Connect SDK is used the Star Topology.
Star topology with an application repository as the manifest repository:
- A repository containing a Zephyr application acts as the central repository and includes a complete list of other projects, including the zephyr repository, required to build it
- Useful for those focused on a single application
- Analogy with existing mechanisms: Git sub-modules with the application as the super-project, zephyr and other projects as sub-modules
- An installation using this topology could look like this:
app-manifest-installation
├── application
│   ├── CMakeLists.txt
│   ├── prj.conf
│   ├── src
│   │   └── main.c
│   └── west.yml
├── modules
│   └── lib
│       └── tinycbor
└── zephyr
Installing west
Install the bootstrapper for West by entering the following command:
pip3 install westYou only need to do this once. Like any other Python package, the west bootstrapper is updated regularly. Therefore, remember to regularly check for updates:
pip3 install -U westWest Command
Check the version of the project

How to checkout the particular version
Updating the repositories
To manage the nrf repository (the manifest repository), use Git. To make sure that you have the latest changes, run git fetch origin to fetch the latest code from the fw-nrfconnect-nrf repository. Checking out a branch or tag in the nrf repository gives you a different version of the manifest file. Running west update will then update the project repositories to the state specified in this manifest file. For example, to switch to release v1.1.0 of the nRF Connect SDK, enter the following commands in the ncs/nrf directory:
git fetch origin
git checkout v1.1.0
west update
To switch to the latest state of development, enter the following commands:
git fetch origin
git checkout origin/master
west update
Run west update every time you change or modify the current working branch (for example, when you pull, rebase, or check out a different branch). This will bring the project repositories to the matching revision defined by the manifest file.
Updating your existing clones to use west
If you already cloned the nRF Connect SDK repositories in Git and want to continue using these clones instead of creating new ones, you can initialize west to use your clones. All branches, remotes, and other configuration in your repositories will be maintained.
To update your repositories to be managed by west, make sure that they are structured and named in the following way:
ncs
 |___ mcuboot
 |___ nrf
 |___ nrfxlib
 |___ zephyr
 |___ ...
Then complete the following steps:
- Open a command prompt in the
ncs\nrffolder. - Do a
git pullor rebase your branch so that you are on the latest fw-nrfconnect-nrf master. - Navigate one folder level up to the
ncsfolder:- cd ..
- Initialize west with the manifest folder from the current branch of your
nrfrepository: (west init -l nrf)- This will create the required
.westfolder that is linked to the manifest repository (nrf).
- This will create the required
- Enter the following command to clone or update the project repositories: (west update).
cd ..Example how to clone the nRF Connect SDK
Initialize west and clone the nRF Connect SDK manifest repository nrf:
Note: If you already cloned the nRF Connect SDK repositories and want to continue using these clones, skip this step and see Updating your existing clones to use west instead.

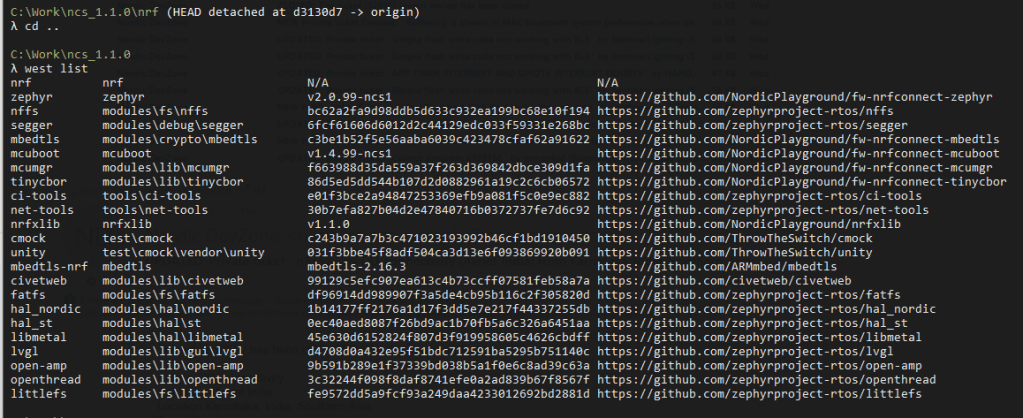
List the current multiple repositories version

Checkout the particular release version such as v1.1.0
Decide if you want to work with a tagged release of the nRF Connect SDK or with the latest state of development.
Note: The latest state is not necessarily tested. For a higher degree of quality assurance, check out a tagged release.
To work with a tagged release, check the Release Notes for that release to find out the corresponding tag. Check out this tag in the nrf repository and use west to update the other repositories:


After checkout the particular release tag, you can use the west list for double checking again.
Set up a project in SEGGER Embedded Studio
You can use the Getting Started Assistant inside the nRF Connect to create the project.
Download SEGGER Embedded Studio
The recommended way of building and programming an nRF Connect SDK sample is to use the Nordic Editionof the SEGGER Embedded Studio (SES) IDE. SEGGER Embedded Studio is free of charge for use with Nordic Semiconductor devices.
Download SEGGER Embedded Studio from the following links:
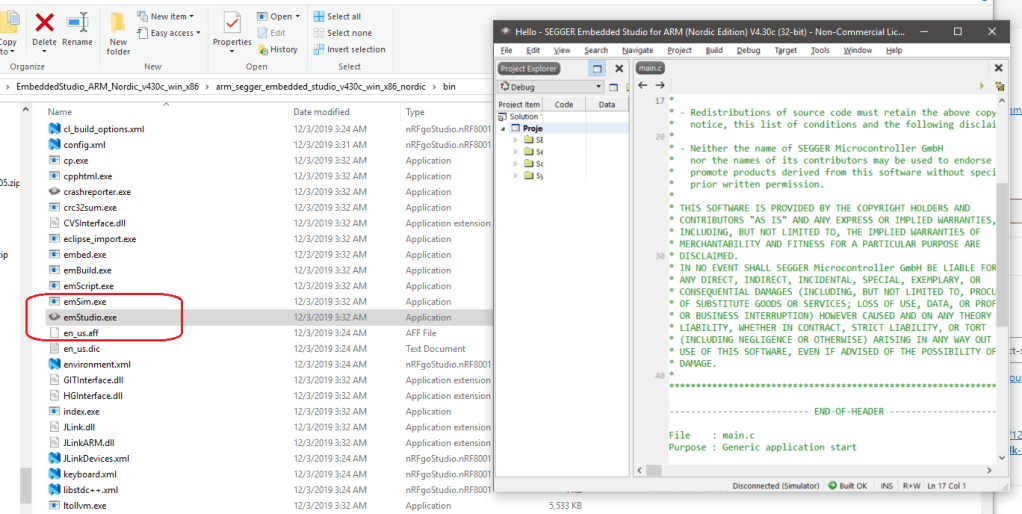
Navigate to the folder where you extracted SEGGER Embedded Studio. In the bin subfolder, run emStudio.
Set up a project
Click Tools > Options and select the nRF Connect tab.
To load and build a project in SES, you must specify the following information:
- Zephyr Base – the location of your cloned Zephyr repository (the full path to
ncs/zephyr) - GNU ARM Embedded Toolchain Directory – the location of your GNU ARM Embedded Toolchain installation (for example,
c:\gnuarmemb)
On my example, the folders are configured as below.
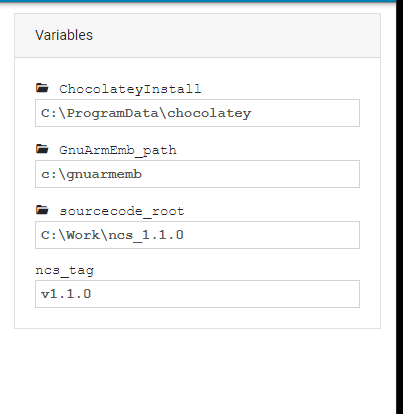
By opening the emStudio -> Tools –> Options,

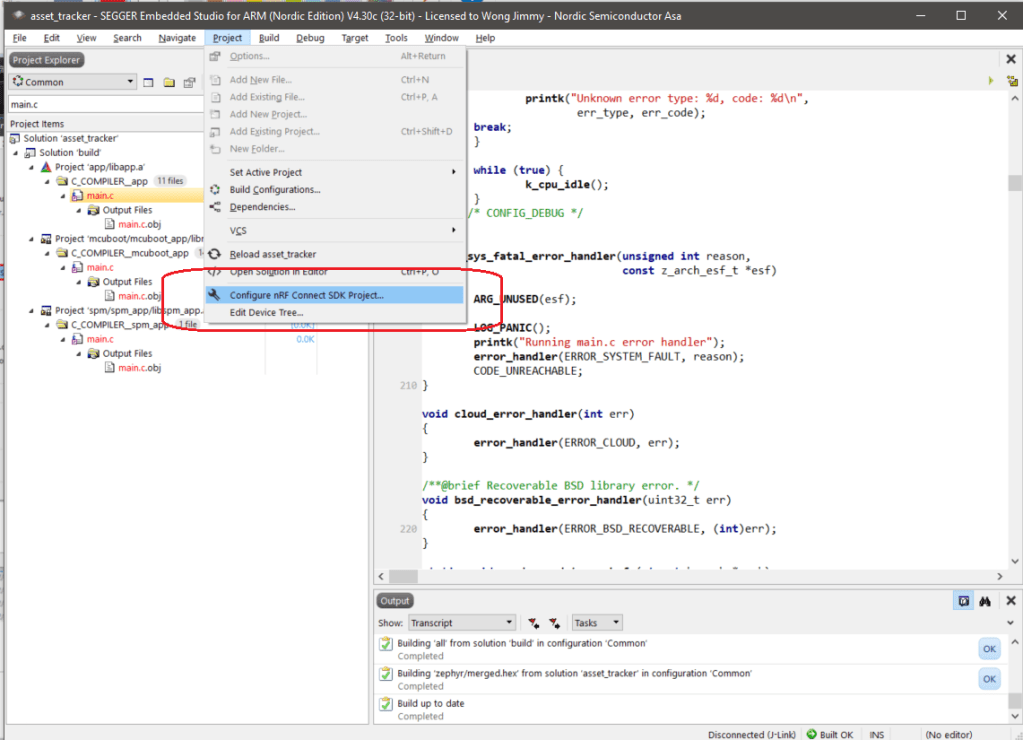
Open nRF Connect SDK Project
Select File > Open nRF Connect SDK Project.
To import a project into SES, you must specify the following information:
- CMakeLists.txt – the location of the
CMakeLists.txtproject file of the sample that you want to work with (for example, the full path toncs/nrf/applications/asset_tracker/CMakeLists.txt) - Board Directory – the location of the board description for which to build the project (for example, the full path to
ncs/zephyr/boards/arm/nrf9160_pca10090) - Board Name – the board name for which to build the project (for example,
nrf9160_pca10090ns) - Build Directory – the folder in which to run the build (for example, the full path to
ncs/nrf/applications/asset_tracker/build) - Delete Existing CMakeCache.txt – select this option to ensure that you are not building with an outdated build cache
Click OK to open the project.


You can do further configure to select corresponding features.
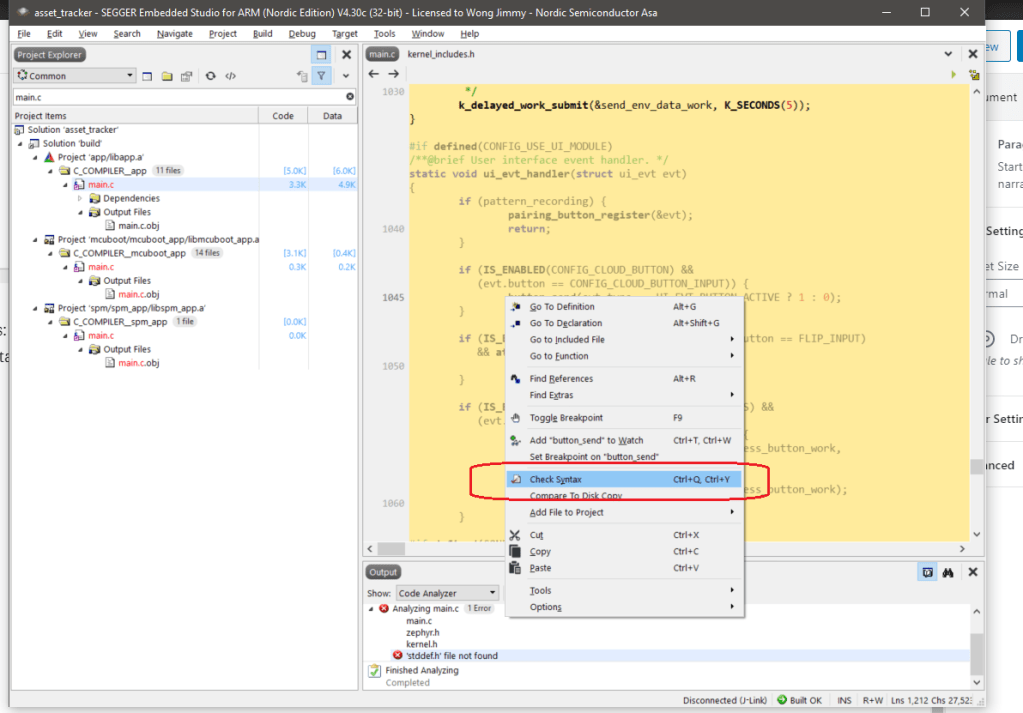
Tips: By using Segger Embedded Studio, it provides the feature to check the Syntax error.
Thanks for your interests on my blog. Since 2019, I have created this blog and shared the idea how to do some funny stuffs. I am very pleasure that I get quite a lot of positive feedback. I really hope that this blog helps your own embedded solution development. May I get support from you to keep it in order to maintain the wordpress host service? Your appreciation would be very helpful.
https://jimmywongiot.com/2021/05/26/asking-for-support/

