
Overview
Have you ever wanted to create professional diagrams directly in your documentation without switching between applications? Mermaid makes this possible right inside Visual Studio Code! In this guide, I’ll show you exactly how to set up and use Mermaid to create beautiful diagrams in your Markdown files – with no external tools required.
Mermaid is a JavaScript-based diagramming and charting tool that lets you create diagrams using text and code. The best part? It integrates perfectly with VS Code, allowing you to design, edit, and preview diagrams all within your development environment.
Why Use Mermaid in VS Code?
- ✅ Create diagrams using simple text syntax (no mouse required)
- ✅ Version control friendly (text-based diagrams)
- ✅ Real-time preview without leaving your editor
- ✅ Perfect for documentation, README files, and technical notes
- ✅ Free and open-source
Step 1: Install Required Extensions
First, you need to install the Mermaid extension for VS Code:
- Open Visual Studio Code
- Click the Extensions icon in the left sidebar (or press
Ctrl+Shift+Xon Windows/Linux,Cmd+Shift+Xon Mac) - Type “Markdown Preview Mermaid Support” in the search box
- Click Install on the extension by “bierner”
Alternative option: You can also install “Mermaid Live Preview” if you prefer a dedicated preview pane.
Step 2: Create Your First Mermaid Diagram
Follow these simple steps to create your first diagram:
- Create a new file with a
.mdextension (e.g.,diagrams.md) - Add a Mermaid code block using triple backticks followed by “mermaid”
- Write your Mermaid diagram syntax inside the code block
- Preview your diagram by pressing
Ctrl+Shift+V(Windows/Linux) orCmd+Shift+V(Mac)
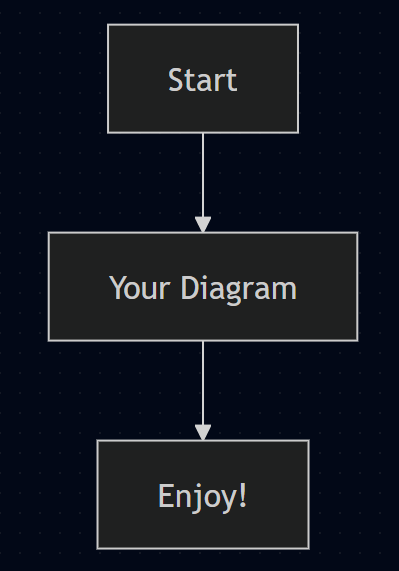
Here’s the basic structure:
graph TD
A[Start] --> B[Your Diagram]
B --> C[Enjoy!]
Step 3: Working with Different Diagram Types
Let’s explore three essential diagram types with practical examples you can copy and use immediately.
Example 1: Timing Diagram (Sequence Diagram)
Perfect for showing interactions between components over time – ideal for API documentation or system architecture.
sequenceDiagram
participant User
participant Frontend
participant Backend
participant Database

User->>Frontend: Submit form
Frontend->>Backend: POST /api/data
Backend->>Database: Query
Database-->>Backend: Results
Backend-->>Frontend: 200 OK
Frontend-->>User: Success message

Note right of User: All operations completed in 250ms
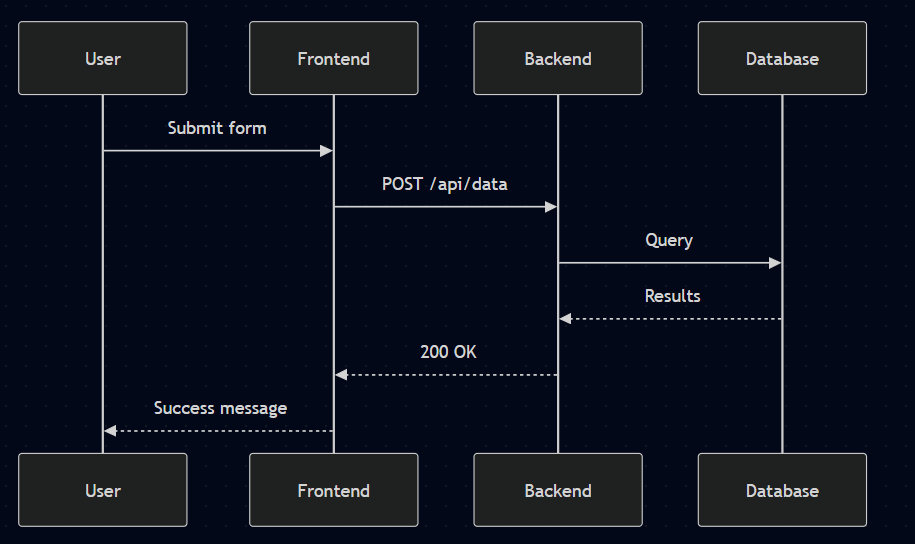
How it works:
participantdefines each actor in the sequence->>shows a synchronous message (solid arrow)-->shows a return message (dashed arrow)Noteadds explanatory text
When you preview this in VS Code, you’ll see a professional-looking sequence diagram showing the flow of a form submission process.
Example 2: Flowchart
Great for illustrating processes, decision trees, or system workflows.
flowchart TD
A[User Login] --> B{Credentials Valid?}
B -->|Yes| C[Dashboard]
B -->|No| D[Show Error]
D --> B
C --> E[Perform Action]
E --> F{Continue?}
F -->|Yes| C
F -->|No| G[Logout]
G --> A

classDef decision fill:#e6f7ff,stroke:#1890ff;
class B,F decision;
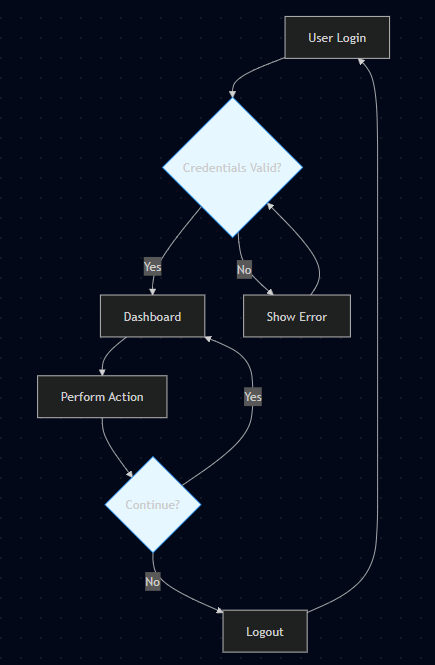
Key features:
flowchart TDcreates a top-down flowchart{}creates decision/diamond nodes|text|adds labels to arrowsclassDefallows custom styling of elements
This example shows a simple user authentication flow with decision points highlighted in blue.
Example 3: Timeline (Gantt Chart)
While Mermaid doesn’t have a dedicated “timeline” diagram, the Gantt chart works perfectly for showing time-based processes.
gantt
title Project Timeline
dateFormat YYYY-MM-DD
section Development
Requirements :done, req1, 2023-01-01, 7d
Design :active, des2, 2023-01-08, 5d
Implementation : impl3, 2023-01-15, 10d
Testing : test4, 2023-01-25, 8d

section Deployment
Staging : stage5, after test4, 3d
Production : prod6, after stage5, 2d

Important syntax:
dateFormatspecifies how dates are displayed:done,:activeshow task status- Duration can be specified as
7d(7 days) or specific dates
This creates a professional project timeline showing development phases and deployment stages.
Step 4: Troubleshooting Common Issues
Here are solutions to the most common Mermaid problems in VS Code:
“No diagram type detected” Error
Cause: Incorrect code block formatting
Solution: Make sure you use exactly:
No spaces after the backticks!
Diagram Not Rendering
Try these fixes:
- Reload VS Code (
Ctrl+Shift+P→ “Reload Window”) - Check for syntax errors (use Mermaid Live Editor)
- Ensure you’ve installed the correct extension
Styling Your Diagrams
Add custom styles using classDef as shown in the flowchart example. You can change colors, borders, and more:
classDef process fill:#f9f,stroke:#333,stroke-width:2px;
class A,C process;
Step 5: Advanced Tips and Tricks
Exporting Diagrams
To save your diagram as an image:
- Open the Markdown preview (
Ctrl+Shift+V) - Right-click on the rendered diagram
- Select “Save as PNG” or “Save as SVG”
Keyboard Shortcuts
Ctrl+Space(Windows/Linux) orCmd+Space(Mac) – Trigger auto-complete for Mermaid syntaxCtrl+P→ type “>Mermaid” – Access Mermaid-specific commands
Using Mermaid in Other Files
While Markdown (.md) files work best, you can also use Mermaid in:
- README.md files in GitHub repositories (GitHub natively supports Mermaid)
- Confluence pages with Mermaid plugin
- Obsidian notes (with Mermaid plugin)
Conclusion
You’re now equipped to create professional diagrams directly in Visual Studio Code using Mermaid! No more switching between applications or wrestling with clunky diagramming tools – just write simple text syntax and see your diagrams come to life in real-time.
Start by adding one of the examples above to a Markdown file in VS Code, then customize it for your specific needs. As you become more comfortable with the syntax, you’ll find Mermaid indispensable for documentation, planning, and explaining complex systems.
Pro Tip: Bookmark the official Mermaid documentation for quick reference to all diagram types and syntax options.
Have questions or favorite Mermaid tricks? Share them in the comments below!

This Mermaid flowchart tutorial is super helpful! I’ve been struggling with diagramming tools for my docs, and this makes it so easy to create clean visuals right in VS Code. No more switching between apps – love how it keeps everything in one place. Definitely trying this for my next project!
LikeLike