This guide provides users with functional descriptions, configuration options for ESP32-LyraT V4.3 audio development board, as well as how to get started with the ESP32-LyraT board. Check section Other Versions of LyraT, if you have a different version of this board.
The ESP32-LyraT is a hardware platform designed for the dual-core ESP32 audio applications, e.g., Wi-Fi or BT audio speakers, speech-based remote controllers, smart-home appliances with audio functionality(ies), etc.
https://docs.espressif.com/projects/esp-adf/en/latest/get-started/get-started-esp32-lyrat.html
Description:
- 1 × ESP32 LyraT V4.3 board
- 2 x 4-ohm speakers with Dupont female jumper wires or headphones with a 3.5 mm jack
- 2 x Micro-USB 2.0 cables, Type A to Micro B
- 1 × PC loaded with Windows, Linux or Mac OS
If you like to start using this board right now, go directly to section Start Application Development.

Get This Release
We use git submodules, therefore, the source files attached to this version will not work.
Using git commands here to obtain ESP-ADF v1.0 is highly recommended.
git clone https://github.com/espressif/esp-adf.git esp-adf-v1.0
cd esp-adf-v1.0/
git checkout v1.0
git submodule update --init --recursive
Connect ESP32 to PC
Connect the ESP32 board to the PC using the USB cable. If device driver does not install automatically, identify USB to serial converter chip on your ESP32 board (or external converter dongle), search for drivers in internet and install them.
Below are the links to drivers for ESP32 and other boards produced by Espressif:
| Development Board | USB Driver | Remarks |
|---|---|---|
| ESP32-DevKitC | CP210x | |
| ESP32-LyraT | CP210x | |
| ESP32-LyraTD-MSC | CP210x | |
| ESP32-PICO-KIT | CP210x | |
| ESP-WROVER-KIT | FTDI | |
| ESP32 Demo Board | FTDI | |
| ESP-Prog | FTDI | Programmer board (w/o ESP32) |
| ESP32-MeshKit-Sense | n/a | Use with ESP-Prog |
| ESP32-Sense Kit | n/a | Use with ESP-Prog |
Check port on Linux and MacOS
To check the device name for the serial port of your ESP32 board (or external converter dongle), run this command two times, first with the board / dongle unplugged, then with plugged in. The port which appears the second time is the one you need:
MacOS
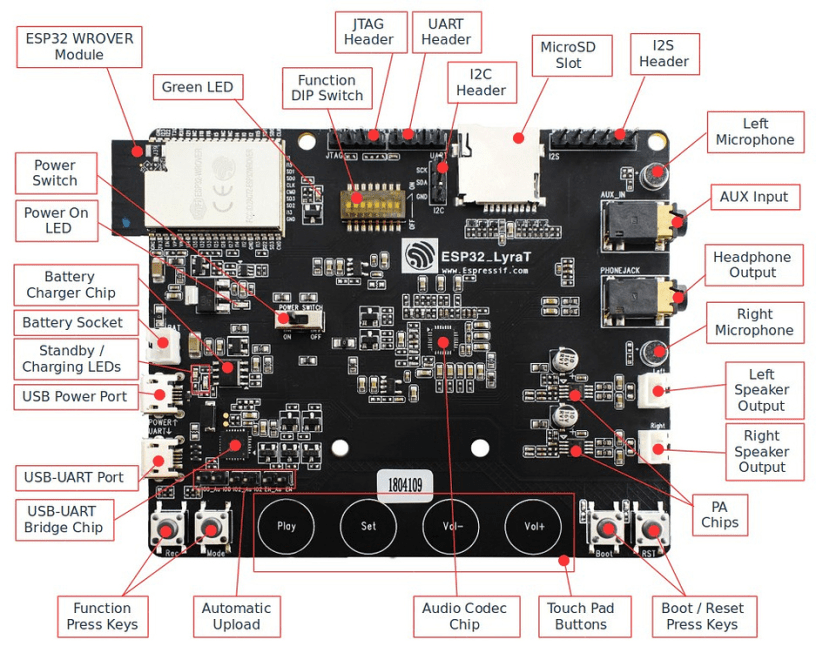
ESP32-LyraT 4.3 Board
/dev/cu.SLAB_USBtoUARTExport the environment variables
In the MacOS, you can prepare the file .profile under ~/. folder and then source this file before running the ESP.
// .profile
export PATH=$HOME/esp/xtensa-esp32-elf/bin:$PATH
export IDF_PATH=~/esp/esp-idf
export ADF_PATH=~/esp/esp-adf
export ESPORT=/dev/cu.SLAB_USBtoUART
Configure
Navigate to your hello_world directory from Step 5. Start a Project and run the project configuration utility menuconfig.
Linux and MacOS
cd ~/esp/hello_world
make menuconfig
If the previous steps have been done correctly, the following menu appears:

In the menu, navigate to Serial flasher config > Default serial port to configure the serial port, where project will be loaded to. Confirm selection by pressing enter, save configuration by selecting < Save > and then exit menuconfig by selecting < Exit >.
To navigate and use menuconfig, press the following keys:
- Arrow keys for navigation
Enterto go into a submenuEscto go up one level or exit?to see a help screen. Enter key exits the help screenSpace, orYandNkeys to enable (Yes) and disable (No) configuration items with checkboxes “[*]”?while highlighting a configuration item to display help about that item/to find configuration items
Build and Flash
Build and flash the project by running:
make flash monitor -j 9This command will compile the application and all ESP-IDF components, then it will generate the bootloader, partition table, and application binaries. After that, these binaries will be flashed onto your ESP32 board.
If there are no issues by the end of the flash process, you will see messages (below) describing progress of the loading process. Then the board will be reset and the “hello_world” application will start up.
IDF Monitor
The IDF monitor tool is mainly a serial terminal program which relays serial data to and from the target device’s serial port. It also provides some IDF-specific features.
This tool can be launched by invoking in IDF the following target:
- For make:
make monitor - For cmake:
idf.py monitor
Keyboard Shortcuts
For easy interaction with IDF Monitor, use the keyboard shortcuts given in the table.
| Keyboard Shortcut | Action | Description |
|---|---|---|
| Ctrl+] | Exit the program | |
| Ctrl+T | Menu escape key | Press and follow it by one of the keys given below. |
| Ctrl+T | Send the menu character itself to remote | |
| Ctrl+] | Send the exit character itself to remote | |
| Ctrl+P | Reset target into bootloader to pause app via RTS line | Resets the target, into bootloader via the RTS line (if connected), so that the board runs nothing. Useful when you need to wait for another device to startup. |
| Ctrl+R | Reset target board via RTS | Resets the target board and re-starts the application via the RTS line (if connected). |
| Ctrl+F | Build and flash the project | Pauses idf_monitor to run the make flash(idf.py flash) target, then resumes idf_monitor. Any changed source files are recompiled and then re-flashed. |
| Ctrl+A | Build and flash the app only | Pauses idf_monitor to run the app-flash target, then resumes idf_monitor. Similar to the flash target, but only the main app is built and re-flashed. |
| Ctrl+Y | Stop/resume log output printing on screen | Discards all incoming serial data while activated. Allows to quickly pause and examine log output without quitting the monitor. |
| Ctrl+L | Stop/resume log output saved to file | Creates a file in the project directory and the output is written to that file until this is disabled with the same keyboard shortcut (or IDF Monitor exits). |
| Ctrl+H | Display all keyboard shortcuts |
Any keys pressed, other than Ctrl-] and Ctrl-T, will be sent through the serial port.

Thank you for your introductory article; it was very informative and concise. However I was wondering if any GPIO ports of the ESP32 in the LyraT board have been exposed, so I could connect my own button and LED to it, or another sensor like a proximity sensor. Please advise, because I don’t see any on the board, so it looks like it is a board designed to handle purely audio things like streaming MP3s from a server, and then accepting voice commands, but sending those commands over UART serial communication to another microcontroller which will flash the LED and do other stuff.
LikeLike