
This blog is to describe how to use different filters on the BLE Central role for connection criteria. Since Nordic SDK 15.2 or later, it has started to include the new BLE Scan (nrf_ble_scan) module. It has supported 5 different filter types as below.
| Filter type | Details |
|---|---|
| 1) Name | Filter set to the target name. The maximum length of the name corresponds to NRF_BLE_SCAN_NAME_MAX_LEN. The maximum number of filters of this type corresponds to NRF_BLE_SCAN_NAME_CNT. |
| 2) Short name | Filter set to the short target name. The maximum length of the name corresponds to NRF_BLE_SCAN_SHORT_NAME_MAX_LEN. The maximum number of filters of this type corresponds to NRF_BLE_SCAN_SHORT_NAME_CNT. |
| 3) Address | Filter set to the target address. The maximum number of filters of this type corresponds to NRF_BLE_SCAN_ADDRESS_CNT. |
| 4) UUID | Filter set to the target UUID. The maximum number of filters of this type corresponds to NRF_BLE_SCAN_UUID_CNT. |
| 5) Appearance | Filter set to the target appearance. The maximum number of filters of this type corresponds to NRF_BLE_SCAN_APPEARANCE_CNT. |
In this blog, I show how to add the extra criteria filter (manufacturer specific data) and then check for particular pattern inside the manufacturer specific payload.
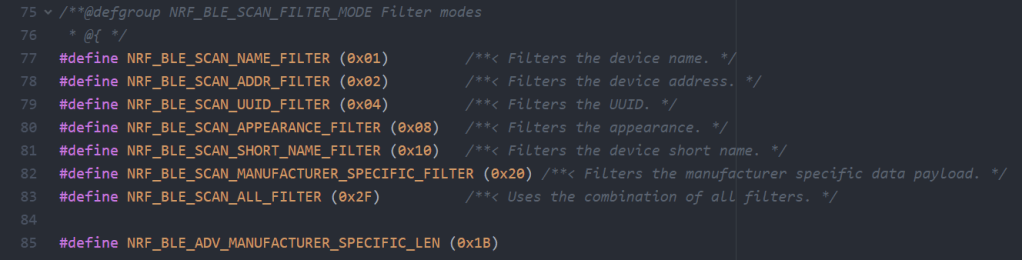
| 6) Manufacturer Specific Data | Filter set to the target manufacturer specific data payload The maximum number of filters of this type corresponds to NRF_BLE_SCAN_MANUFACTURER_CNT. |
Overview on Scanning Module
The Scanning Module handles the BLE scanning for your application. You can use it to find an advertising device and establish a connection with it. The scan can be narrowed down to the device of a specific type by using filters and the whitelist. The module can be used for most of the SDK BLE examples.
The Scanning Module can work in one of the following modes:
- simple mode without using filters and the whitelist, or
- advanced mode that allows you to use advanced filters or the whitelist.
https://infocenter.nordicsemi.com/topic/com.nordic.infocenter.sdk5.v15.3.0/lib_ble_scan.html
Usage
| Action | Description |
|---|---|
| Initialization | The module must be initialized with nrf_ble_scan_init that can be called without event handler and initialization structure. When initialization structure is passed as NULL, the default static configuration is used. This configuration is also used when you use an initialization structure with NULL pointers to scan parameters and connection parameters. Event handler also can be initialized as NULL, but then the application does not get events that inform about a filter or whitelist match, or about a connection error during the automatic connection. |
| Starting scanning | When initialization completes, you can start scanning with nrf_ble_scan_start. In the simplest mode when you do not using event handler, the connection can be established when BLE_GAP_EVT_ADV_REPORT occurs. |
| Changing parameters | Call the function nrf_ble_scan_params_set to change parameters. |
| Stopping scanning | Call the function nrf_ble_scan_stop to stop scanning. |
| Resuming scanning | The Scanning Module resumes scanning after receiving advertising reports. Scanning stops if the module established the connection automatically, or if the application calls nrf_ble_scan_stop or sd_ble_gap_connect. |
Initialization
The Scanning Module can be initialized with a simple or an advanced method. Both correspond to some extent to the respective Scanning Module modes.
Simple initialization
You can use the simple initialization with the default scanning parameters when you want the Scanning Module to work in the simple mode without filtering and the whitelist.
ret_code_t err_code;
err_code = nrf_ble_scan_init(&m_scan, NULL, NULL);
APP_ERROR_CHECK(err_code);
err_code = nrf_ble_scan_start(&m_scan);
APP_ERROR_CHECK(err_code);
Advanced initialization
You can use the advanced initialization when you want the Scanning Module to work in either the simple mode without filtering and the whitelist or the advanced mode that uses advanced filters. You can configure this initialization to your needs, for example by disabling the whitelist and enabling the automatic connection establishing.
/**< Scan parameters requested for scanning and connection. */
static ble_gap_scan_params_t const m_scan_param =
{
    .active        = 0x01,
    .interval      = NRF_BLE_SCAN_SCAN_INTERVAL,
    .window        = NRF_BLE_SCAN_SCAN_WINDOW,
    .filter_policy = BLE_GAP_SCAN_FP_WHITELIST,
    .timeout       = SCAN_DURATION_WHITELIST,
    .scan_phys     = BLE_GAP_PHY_1MBPS,
    .extended      = true,
};
    ret_code_t err_code;
    nrf_ble_scan_init_t scan_init;
    memset(&scan_init, 0, sizeof(scan_init));
    scan_init.p_scan_param     = &m_scan_param;
    scan_init.connect_if_match = true;
    scan_init.conn_cfg_tag     = APP_BLE_CONN_CFG_TAG;
    err_code = nrf_ble_scan_init(&m_scan, &scan_init, scan_evt_handler);
    APP_ERROR_CHECK(err_code);
    err_code = nrf_ble_scan_start(&m_scan);
    APP_ERROR_CHECK(err_code);
Whitelist
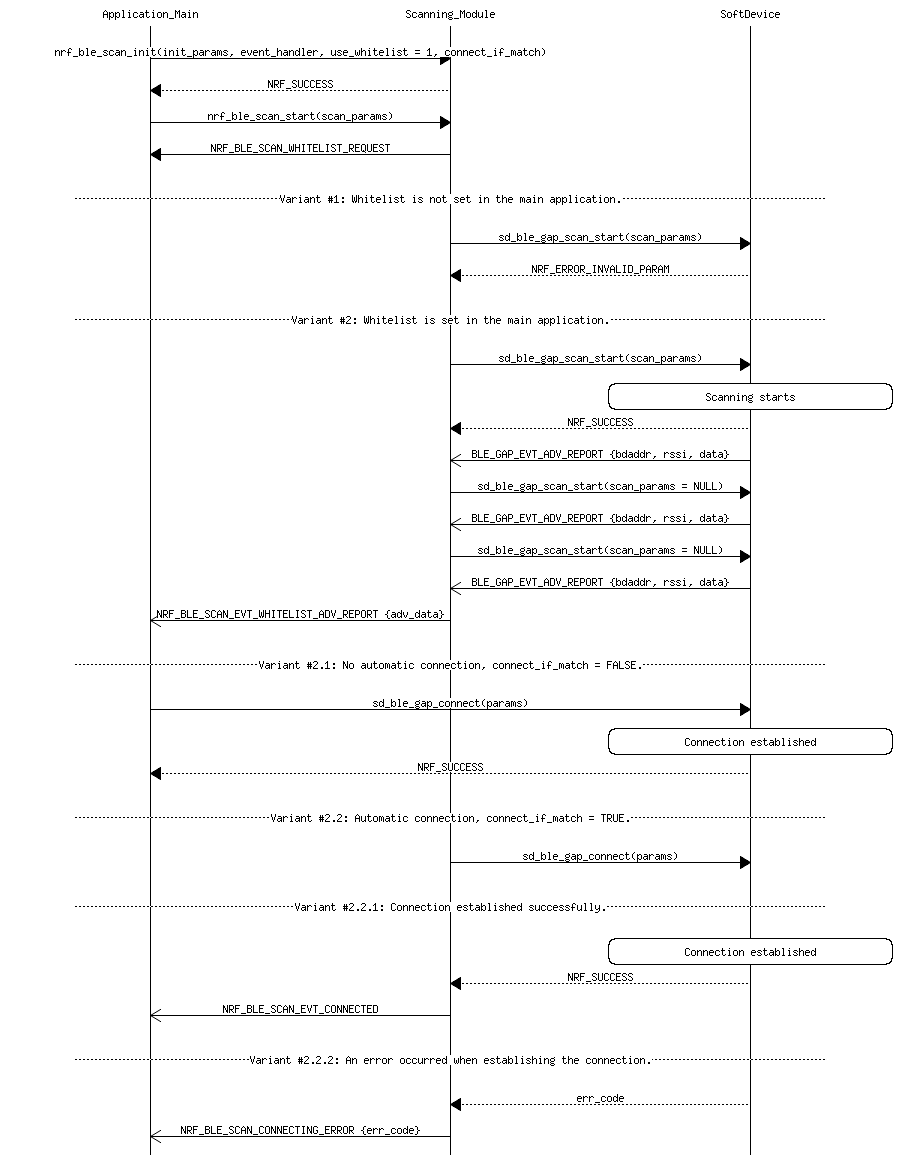
The whitelist stores information about all the device connections and bonding. If you enable the whitelist, the application receives advertising packets only from the devices that are on the whitelist.WarningIf you use the whitelist, you must pass the event handler during the module initialization. The initial scanning with whitelist generates NRF_BLE_SCAN_EVT_WHITELIST_REQUEST to the main application. The application must react to this event by either setting up the whitelist or switching off the whitelist scan. Otherwise, an error is reported when the scan starts.
You can use nrf_ble_scan_params_set to enable or disable the whitelist scan both during and after the initialization of the module.
Note
- When you use nrf_ble_scan_params_set during the ongoing scan, scanning is stopped. To resume scanning, use nrf_ble_scan_start.
Finding an advertising package that belongs to a whitelisted device generates the NRF_BLE_SCAN_EVT_WHITELIST_ADV_REPORT event.
Note
- When using the whitelist, filters are inactive.
Filters
The module can set scanning filters of different type and mode. When a filter is matched, it generates NRF_BLE_SCAN_EVT_FILTER_MATCH to the main application. If the filter matching is enabled and no filter is matched, NRF_BLE_SCAN_EVT_NOT_FOUND is generated.
Filter modes
The following two filter modes are available.
| Filter mode | Behavior |
|---|---|
| Normal | Only one of the filters you set, regardless of the type, must be matched to generate an event. |
| Multifilter | In this mode, at least one filter from each filter type you set must be matched to generate an event, with UUID as an exception: all specified UUIDs must match in this mode. Example: Several filters are set for name, address, UUID, and appearance. To generate the NRF_BLE_SCAN_EVT_FILTER_MATCH event, the following types must match: – one of the address filters, – one of the name filters, – one of the appearance filters, – all of the UUID filters. Otherwise, the NRF_BLE_SCAN_EVT_NOT_FOUND event is generated. |
Filter usage
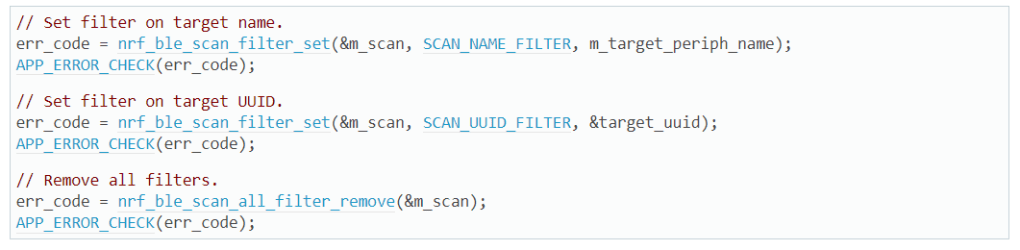
You can use filters after module initialization. You can enable filters with nrf_ble_scan_filters_enable. Filters can be activated for one filter type, or for a combination of several filter types.

To disable all enabled filters, use nrf_ble_scan_filters_disable.

Filters can be set and removed dynamically while the application is running, regardless of whether they are enabled or disabled. Switching off a filter does not reset filter settings. Call nrf_ble_scan_filter_set to set the selected filter type nrf_ble_scan_filter_type_t or call nrf_ble_scan_all_filter_remove to remove all filters.
Message sequence chart
See the following short examples of a typical application to see the Scanning Module flow and how the module is used.
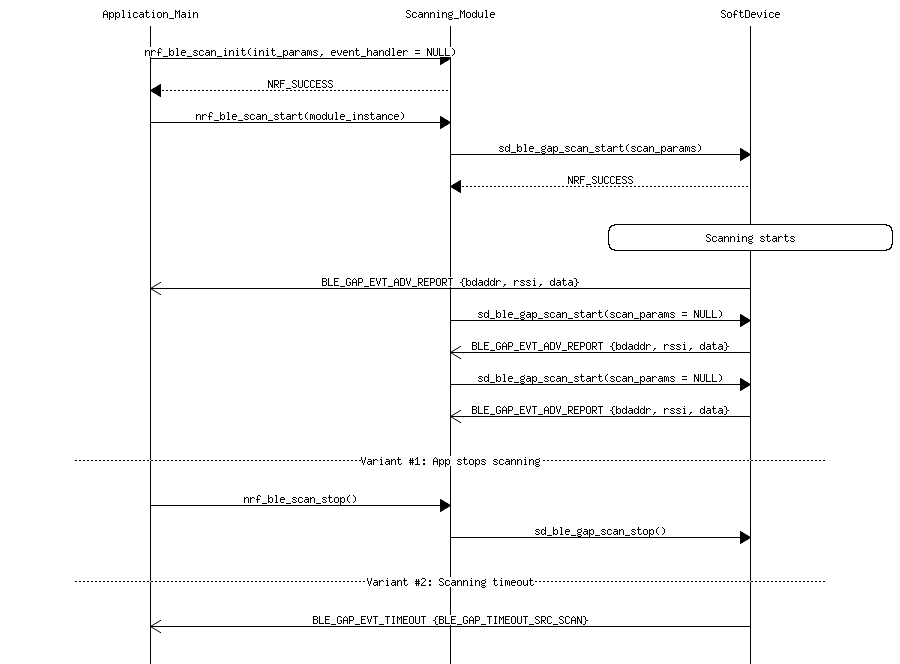
Message sequence chart example 1: Simplest mode
In the first example, the application starts scanning in the simplest mode, without filters and the event handler.
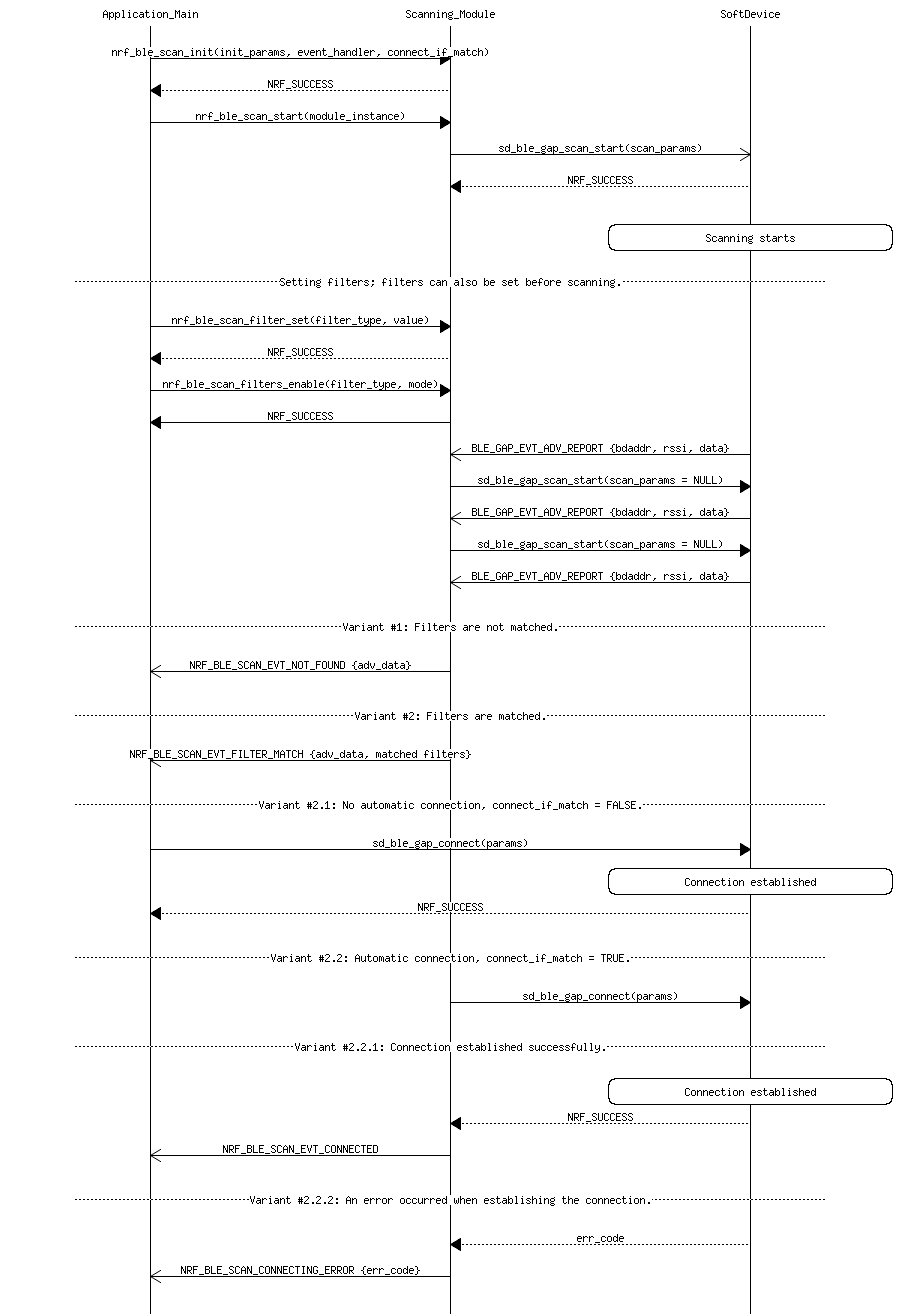
Message sequence chart example 2: Scanning with filters
In the following second example, the application starts scanning, then enables and sets the filters. Automatic connections after matching filters are also shown.
Message sequence chart example 3: Scanning with whitelist
The following third example shows scanning with whitelist.
Manufacturer Specific Data as Filter Type

Manufacturer specific data can be used to add any custom data into advertising packets, using any format that is suitable for your application. For example, you could create a beacon that includes the reading of a temperature sensor it the advertising data.
The first 2 octets contain the Company Identifier Code. Company Identifiers are listed at https://www.bluetooth.com/specifications/assigned-numbers/company-identifiers . The remaining bytes in the custom element can be used for any purpose. The total size of the packet obviously cannot exceed the maximum size that is 31 bytes. (0x0059 represents Nordic Semiconductor ASA).
https://jimmywongbluetooth.wordpress.com/2019/08/13/advertising-payload-format-on-ble/
The company ID 0xFFFF is reserved for test use only. This is quoted from the BT SIG webpage linked above:
This value (0xFFFF) may be used in the internal and interoperability tests before a Company ID has been assigned. This value shall not be used in shipping end products.
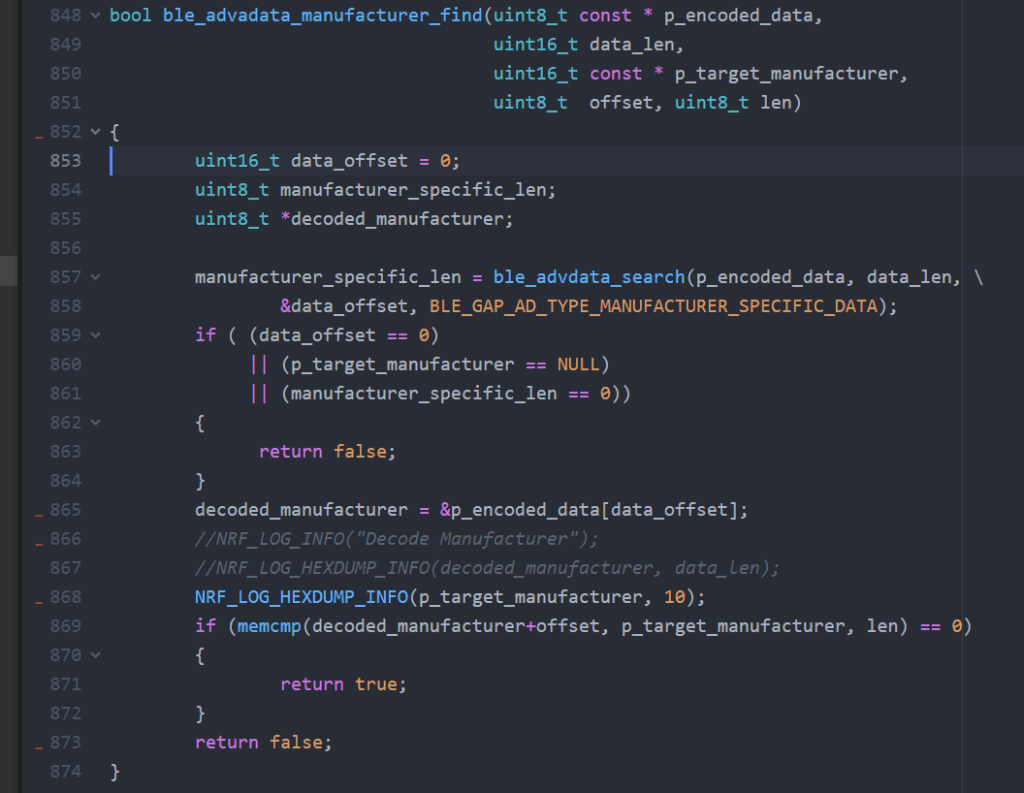
How to add the manufacturer specific filter
Here are the example how to add the filter inside the nrf_ble_scan and ble_advdata.


Find the manufacturer specify payload inside the advertising payload
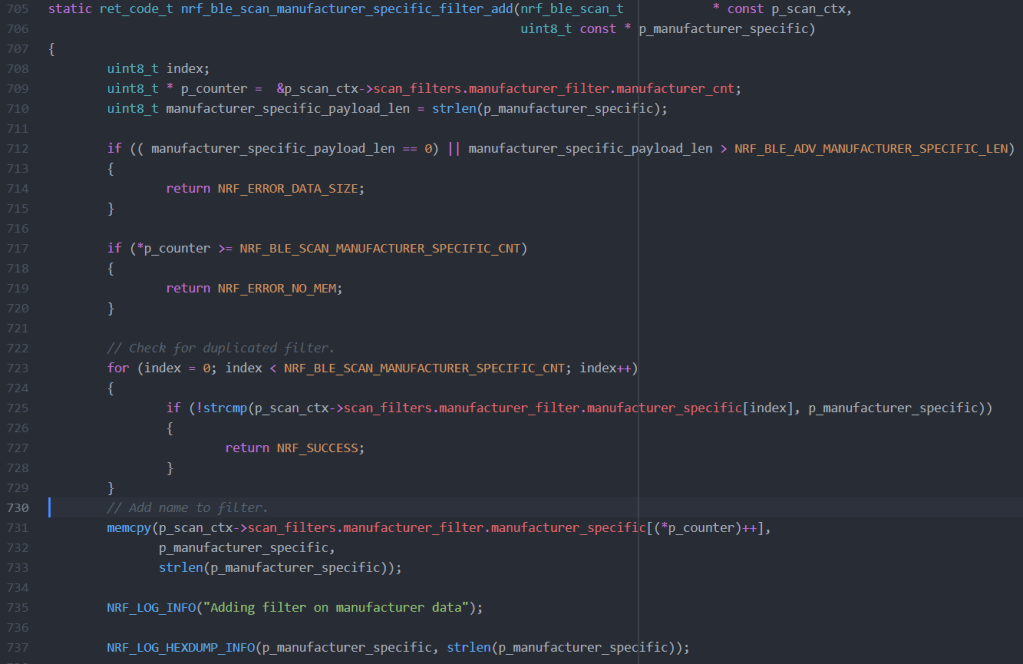
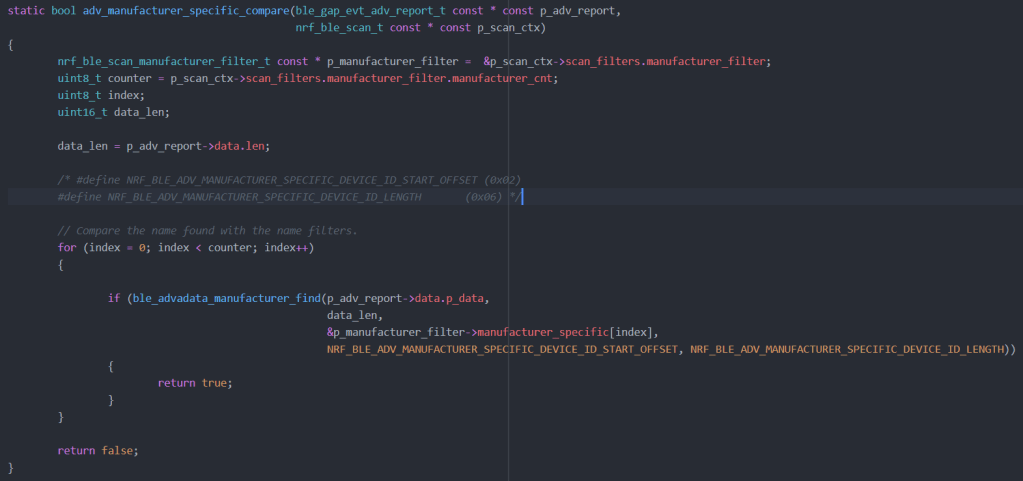
Select the Manufacturer Specific Filter and Enable it

